
Frequently Asked Questions
If you can’t find the answers you are looking for please email us at support@gigatrak.com
Question: How can I assign the storage facility and storage location of tools that are added with the “Add Tools” function on the mobile handheld terminal?
Answer: Tools added using the “Add Tools” function on the handheld terminal are assigned default storage facility and location. The default is ‘unassigned facility/unassigned location”.
The storage location and storage facility can be changed either by editing these fields from the Tool Information screen, OR, there is a “Change Storage Location” button on the Tool Find screen.
From the “Find Tool” screen grid, simply choose which tools you wish to adjust the storage location for (a single tool, or multiple tools can be selected) and select the “Change Storage Location” button. Enter/select the new Storage Facility/Location and make the re-assignment.
Question: How do you attach web link information to an asset or tool record?
Answer: For ATS, put the web address in a Word document as a hyperlink, then ‘add’ the document to the tool information screen. To Add, from the Asset Information window, Select Edit | Select the Images & Docs tab | Select Add File. Then link to the word doc that contains the hyperlink. When you select the Word document and open it, you can Ctrl + click on the address to access the link.
For TTS, from the Tool Information window, Select Edit | Select the Images & Docs tab | Select Add URL
Question: What is the best way to ‘Add’ Tools or equipment into the Tool Tracking application? I thought we could add them with the handheld terminal, but when I try to scan the barcode on the tool, it comes back as ‘unknown’.
Answer: TTS provides 5 options for adding tools to the system:
- Import the items via spreadsheet format
- Add items directly from the Tool Information function, using the “Add” button
- Copy existing items and making simple modifications
- Use the Master / Catalog / Template feature
- Use the ‘Add Tool’ function on the mobile, handheld terminal TTS application
Import templates can be found on the TTS Software section of the Client Center training section on our webpage.
Additional details regarding how to use the Master function, as well as how to Add Tools using a
mobile, handheld terminal with the TTS client installed on it, can also be found in the same TTS website training section under “Supplemental Information”.
Question: When we assign a picture to an asset (generic picture) is there a way we can assign that picture to all the “alike” assets verses each asset at a time?
Answer: There isn’t a way to assign the same image to an “alike” asset, but you could assign images to assets other than by adding them manually from the Asset Information screen. This hint is provided as a courtesy only. As there are other details to consider, it is not recommended to use this method prior to having the GigaTrak training session for your product.
Alternative method to Assign Asset Image to existing Assets
- Create backup of the application’s SQL or Access database
2. Add the image, or images, you wish to use to the GigaTrak application Image folder:
Default folder is C:\GigaTrak\Asset Tracking System\Images
(Note: This path may have been changed, depending on your individual installation.)
3. Next, Open PC application | Log in
4. Select the File text tab | Select ‘Update Asset Data Export/Import’ Select ‘Export Current Asset Data for Update’ button Save the *.txt file with a name and to a directory that you choose
5. Open Excel and drag the *.txt you just created into the Excel Spread sheet
In the Asset Image Column (current ATS version defaults this to Column R, but this could change with versions updates), add the asset image name and image extension (.bmp, .gif, .jpg)
6. Save the Excel file as a *. txt (Tab delimited) file
7. From the GigaTrak PC application: Select the File text tab | Select ‘Update Asset Data Export/Import’
8. Select the ‘Find File’ button Locate the *.txt file that you just saved
9. Select the ‘Import File’ button
This will update the existing asset records with their new image assignments.
You can now to the Asset Information function and view the asset(s) record to confirm the image assignment.
Question: When designating a “new” Classification, or Type, from in the “Classification” and “Type” fields in the ATS (Asset Information) or TTS (Tool Information) functions, no Maintenance or User-Defined fields are added. Why not?
Answer: Maintenance is tied to the TYPE, not the CLASSIFICATION. The same with User Defined fields. Both are TYPE specific. Adding a ‘new’ classification or type from the Asset Information or Tool Information functions ONLY adds the new class and/or type.
If additional details need to be included for a certain “Classification/Type” combination, these will need to be entered directly from the Asset or Tool ADMINISTRATION function located under the SUPPORT Text Tab.
The reason is to maximize flexibility in how Classes and Types are structured. A Class can cover a large segment of equipment:
Class: Test Equipment
Types: Digital Volt Meter
Thermal Imager
Gas Sniffer
Etc.
User define fields could be different for each type. Maintenance could be common or different depending on the tool type.
Question: The “Count” Function is primarily for taking inventory of binned or quantity items.
Answer: The ‘Audit’ Function is strictly for the purpose of ‘auditing’. There are a couple of options for Audits:
–Audit a person or place (checkout/usage/assignment location)
The audit function pulls up a list of items that have been checked out (AKA, assigned) to a person or a place, with the exception of ‘binned’ or quantity items. You then go to that person or place and scan all items found.
– Audit a storage location
Auditing a storage location will provide a listing of all items located at that storage location, with theexception of ‘binned’ or quantity items. Inventory of ‘binned’ or quantity items in storage locations are conducted with the “Count” function on the handheld terminal.
– IF the product is TTS (Tool Tracking) … Audit a container
Auditing a container will provide a listing of all items assigned to that container, with the exception of ‘binned’ or quantity items. Inventory of ‘binned’ or quantity items in storage locations are conducted with the “Count” function on the handheld terminal.
Any items remaining on the audit list (items not found) are considered missing and will need to be reconciled with the system database.
Additional ‘extra’ items found will be reassigned to that person, place, or container at which they were currently located – once the database and handheld transactions are merged.
Question: I looked up how to set up the printer, but when I went to install the ribbon on top, I don’t have an empty roll for it to feed into. I can’t find this anywhere.
Answer: The printer ships with a small cardboard spindle (it’s just a spindle like the one that the original ribbon is wrapped around) …… that is to be used as a “take up” spindle. Users sometimes confuse this with the general packing material and it gets tossed. Likely, that’s what happened in this case.
You’ll need to contact our Sales Dept. for a replacement: 1.877.204.9237
Question: I am finding it rather difficult to read small, stand-alone 1D codes. What I have done is block off any additional barcodes in the area if they are present, and it has helped, but long 1D and small 1D are next to impossible.
Answer: The barcodes may be too dense or small for a standard range imager to read reliably. Barcodes are classified not only by Type (Linear, 2D, 417PDF, RSSI, QR, etc.), but also by “mil spec” or size and density. It may be that the scanner being used does not meet the specifications to scan that particular type of barcode.
(You might also check and be sure there is no protective film covering the scanner/imager lens.)
Question: I am trying to scan barcode – looks like a bunch of dots in a box, but, the scanner won’t read it?
Answer: It sounds like you may be trying to scan 2D or image type barcode with the wrong type of scanner. Scanners are designed to scan either linear (straight line), or 2D (image style) barcode. Typically a “linear” imager only scans linear barcode, while a 2D area imager, will scan either.
Question: I have existing inventory locations. Can I use the same ones we already have with your system? Here are some samples of their format: A102:25 ….. ShelfB-Bin3.
Answer: Often existing user location, part number and employee IDs can be used with the GigaTrak system; however, in your case, these location values are not completely viable.
Within various barcode symbologies, barcode scanners interpret certain characters as “control” characters; as such, they scan the “control” character, but the what they decode it as is not what you see. For example, a single colon : could be interpreted as a control character with multiple character output.
Our embedded label designer allows for generating barcodes in Code 39, Code 128 numeric, and Code 128 alphanumeric.
Recommended characters for the barcodes used would be: Numbers 0-9, Letters A-Z or a-z, and these three Characters: ” ” (Space) “.” (Period) “-” (Dash or Hyphen)
Question: I have just received my new mobile terminal. I left it charging, in the dock, overnight; but, it will not function outside of the dock.
Answer: Some batteries ship with a protective covering over the battery pins. This film is very small and often missed when placing for the first time into the terminal. It must be removed or the battery will not charge.
It’s also possible there is a problem with either the battery or the dock. It may be necessary to contact our technical support group to troubleshoot the problem.
Modern batteries today are good for 300-400 cycles or charges. After that, they decline in performance. Handheld barcode terminals are designed to provide a full shift of use – typically 8 hours. This does require that the battery be fully charged and serviceable. Newer batteries, do however, fail quickly once their lifespan is up. So, once performance begins to drop in less than 8 hours of use, it will soon be time to replace the battery. GigaTrak can provide these replacement batteries from a variety of manufacturers – LXE, Intermec, Honeywell, Datalogic, Motorola…..
Question: Can I search for details in the Tool Record from the Find Tool Screen:
Answer: There are various options for search from the ‘Find Tool’ function Use the drop-down boxes for the obvious….. facility, location, class, type, etc.
Use the ‘Search Field’ and ‘Other Search Field’ options for additional data:
Note: Barcode MUST be exact; however, the other fields may be partial:
Question: Can you help me with the use of containers in the TTS? I would like to know how to set them up, their usage and applications. Also, how does the use of a container relate to other items.
Answer: Essentially, a ‘Container’ is classified as a ‘tool’ into which items are placed. For example, it could be a “box,” a “toolkit,” a ‘truck,” a “pallet,” a ‘kit’.
Typically, items or assets can be check out ONLY to a Person or a Location with the exception of the ‘container’. Items can be checked out to a ‘container’, then that container can be checked out to a ‘person’ or ‘location’.
Note: Once a tool is defined as a ‘container’, it’s always a container. This is not an editable field once the tool is saved.
Example detail: There is a “safety equipment bag”: The Safety Bag is defined as a “container” by checking the Container check box on the Tool Information screen:
Now, from the Check Out Function, Check out (F1), Select “Container”, and select the items/tools to be placed in the container:
Then, assign or “check out” the “Container” (in this case, the safety bag) to either a Person or a Location:
Question: How do I check in a Container?
Answer: Using the Check In function on either the main TTS PC application or from the
mobile handheld data terminal, this is very simple:
Check Container (Only) In
Option 1: From the PC TTS Application
- Select the Check In/Out Function
2. Select ‘Check In by Tool’ (F2) tab
3. Enter the Container barcode in the Tool Barcode field or,
Select the Tool Barcode 3-dot description box and Select the
Container Barcode from the list
5. Select Save or Save/Print
Option 2: From the Handheld Data Terminal TTS Application
- Select the Check In Function
- Scan the Container barcode
(Option: from the drop down on the upper right hand side of the
screen, you can note if the item is lost or broken.)
3. Select Back to Menu when finished
Question: How do I check just “one” tool that’s been assigned to a Container if the container
has a bunch of other tools in it also?
Answer: Using the Check In function on either the main TTS PC application or from the
mobile handheld data terminal, this is very simple:
Check In a single Tool from a Container
Option 1: From the PC TTS Application
- Select the Check In/Out Function
2. Select ‘Check In by Tool’ (F2) tab
3. Enter the Container barcode in the Tool Barcode field or,
Select the Tool Barcode 3-dot description box and Select the
Container Barcode from the list
5. Select Save or Save/Print
Option 2: From the Handheld Data Terminal TTS Application
- Select the Check In Function
- Scan the Container barcode
(Option: from the drop down on the upper right hand side of the
screen, you can note if the item is lost or broken.)
3. Select Back to Menu when all check ins are completed.
Once either ‘check in ‘transaction is done, the tool will no longer be checked out to the container. It will be checked back in to its Storage Location. The remaining tool(s) still checked out to the container will remain in the container.
Question: How would I check out or assign tools to a jobsite. Is a Jobsite a “Location”
or an Employee…….I don’t see any mention of this in the application?
Answer: Jobsites typically fall under the category of “Location”. A “ Location” falls under the
category of “Facility”. A ‘Facility’ can be a real, physical facility (a building, a campus, Lab office….etc.). Or, it can be a pseudo (virtual) place (jobsites, vehicles, projects….etc.).
So, to assign anything, tools/equipment or containers (which are, technically, tools) to a jobsite, First:
- From the Support Tab | Select Facility Administration
Add a Facility named “Jobsites”
Add any additional detail you wish on this screen
Select SAVE
- From the Support Tab | Select Location Administration
Select Add
Select Facility “Jobsites” from the drop down arrow
Fill in the Location field with the Jobsite name
Assign the Location (IE., jobsite) a Barcode…. this could be the
jobsite name, the PO, etc…
Add any additional detail you wish
Select SAVE
- Now, proceed to the Check In/Out Function
Check Container out to a Jobsite
1. Select the Check In/Out function
2. If not already selected, selected Location Radio button
3. Enter the Location Barcode,
– or Select the Location Barcode (from the 3-dot Container box)
Select OK or double-click on desired item
4. Enter the Container Barcode (in the Tool Barcode field)
– or Select the Container Barcode from the Tool Description
screen (Select the 3-dot Description box)
5. If additional Containers OR Tools are needed for the job, continue
selection process until all containers and tools required appear in
selection grid.
(Note: Multiple items can be selected from the list by selecting the first item:
- then, hold down the Ctrl button on the keypad and selecting
additional, individual items
- or, hold down the Shift Key to select a single group of items
in a row
6. Once all Containers OR Tools for the Job are selected, Select SAVE
Question: How do I put tools into a container?
Answer: Tools or equipment are assigned to a container in the same way they are assigned or ‘checked out’ to a Location or a Person:
Check Tools out to a Container
- Select the ‘Check In/Out’ Function
- Select the ‘Check Out’ Tab
2. If not already selected, selected Container Radio button
3. Enter the Container Barcode
– or Select the Container Barcode (from the 3-dot Container box)
Select OK or double-click on desired item
4. Enter the Tool Barcode (in the Tool Barcode field),
– or Select the Tool Description (3-dot box) to choose the tool from a list.
Select OK or double-click on desired item
5. If additional tools are needed, continue selection process until all tools required appear in selection grid
(Note: Multiple tools can be selected from the tool list by selecting the first tool:
- then, hold down the Ctrl button on the keypad and selecting additional, individual tools
- or, hold down the Shift Key to select a single group of itemsin a row
6. Once all tools are selected | Select SAVE
Question: I am not clear on how a container is supposed to be created. My company sets up metal racks for welders and I need to be able to assign specific components (equipment) to those racks to track as a group.
Answer: A Container is a “grouping” of items….. could be a ‘kit’, could be a ‘bundle’, could be a ‘toolbox’…….. it’s easy to set up one. Create either a “Master” (I.E., template) container, or create a container directly from the Tool Information function in TTS:
Create a container
NOTE: Instructions below are assuming there are existing container(s) master items, which is something you mentioned over the phone.
1. Click on Tool button
2. Click on Tool Information tab
3. Click ADD
If creating from a Master (I.E., Template):
– Select the Master item box (3 dot box, top left corner of screen)
– Select Container Master item from the listing
– Select Storage Facility
– Select Storage Location
– If auto-barcode is NOT turned on in Setup Options, enter
barcode information
- Fill in any other ‘optional’ details
If creating as a totally New item:
– Select Classification
– Select Type
– Enter Description
– Select Storage Facility
– Select Storage Location
– If ‘In Service Date’ is not correct, Select correct date
– Check “Container’ box (Located under “Primary Data” Tab)
– If auto-barcode is NOT turned on in Setup Options, enter
barcode information
- Fill in any other ‘optional’ details
9. Click Save
Question: I already added a lot of tools/assets to my TTS database. How do I copy a tool record over to a create a new tool Master (or Catalog) item?
Answer: Select a Tool from the Find Tool screen. Then, from the Tool Information screen, Select “Edit”. Place an identifier (a tag by which to look up the Master (or Catalog) item later) in the Master (or Catalog) data field. (DON’T select the Master (or Catalog) ellipsis button, as this will just pull up a search screen of existing Master (or Catalog) items.)
Last, Select Save; this will save that Tool information as a new Catalog item.
Question: I made setup errors or had import errors when I was setting up the system. How do I delete the SQL database and start over with a fresh one?
Answer: You don’t necessarily need to delete the existing database or reinstall the GigaTrak application if there is limited room on the SQL server. However, a new SQL database will need to be setup.
(If you hesitant to do this, have any issues with these steps, or need further assistance, contact our technical support group for assistance.)
To create a new clean SQL database and connect to PC application, follow these steps:
- On the server, open Microsoft SQL Server Management Studio
- Create the new database, using the instructions provided in the
‘GigaTrak_SQLSupplement(TTS,ATS,STS,or IMS)’ document provided
for each product. This document can be found on the GigaTrak Client
Center website section.
3. Run the SQL Script provided in the Order Acknowledgement email that was received when the GigaTrak software application was purchased.
If the software app has been updated since the original setup and there were database changes, you will also need to run the updated SQL Scripts provided with the update.
4. Assign either ats_user, tts_user, sts-user, or ims-user to the database (depending upon the product purchased).
5. Next, if this was a server/workstation installation, go to the shared folder created with network server install. If there was a standalone install, go to local installation folder.
6. Locate win_ats.ini, win_tts.ini, win_sts.ini, or win_ims.ini (Configuration File) in that folder.
7. Change the bolded section:
[Settings]
Prodserver= This will be the server name
Dbname=win_tts, win_ats, win_sts OR win_ims (new database name.. depending upon the product installed)
8. Click Save
9. Open the GigaTrak application
10. Look at the bottom right of the application screen to locate the database name. Verify the correct database has been connected to the application.
Question: How do we delete an asset and or location from Gigatrack if we no longer want it in the system
Answer: The Delete and Purge feature must be enabled in the system in order to
delete items or locations. NOTE: Once this setting is set, all users will have the ability to delete.
To Delete an asset or item:
1. From the GigaTrak PC application:
Select the File text tab | Select ‘Setup Options’
2. Select F2 tab ‘Application Settings’
3. Check the ‘Allow Delete Asset & Purge History’ box
Select OK
Select Yes
4. Select the Assets function button
Search for the Asset you wish to delete
Either double click on the asset in the grid listing,
or highlight it and Select the Asset Information tab
5. Select the Delete button
Select Yes
Select OK
To Delete a Location :
As long as the Location has no history attached to it, meaning any assets
or items previously assigned to it has been deleted, the Location can be
removed.
1. From the Support text tab, Select ‘Location Administration’
Locate and Select the Location you wish to delete
Select the Delete button
Question: I can’t get the Depreciation field to display for my binned items?
Answer: Depreciation is only applicable to “unique”, individual items. It does not apply to binned or ‘quantity’ items.
Unique, or individual items have their own unique barcode. There is only ‘1’ of an individually barcoded item in the system. It is easily tracked based on the information recorded in its information record, including the ‘In Service Date’. The ‘In Service Date’ is what Depreciation keys off.
Binned, or quantity items are not unique. There is simply one barcode that identifies a random group of items. Binned item quantities can be increased at any time, simply by adding additional quantities. With a grouping of items, there’s no way to identify one as an individual; no way to determine In Service Date for any particular item in the bin.
Therefore, there is no way to accurately calculate depreciation on any particular binned item.
Yes and no. Reservations are created with a priority setting that allows the user to describe the importance of the reservation. For reservations with a low and medium priority, tools may still be checked out to any user of the system. For those with a high priority, tools will only be checked out to the person/location of the reservation.
Yes. With the purchase of any software application, GigaTrak provides a complimentary training session that provides you with the basics in order to implement your system. The training takes place over GoToMeeting, an online meeting resource that allows for screen-sharing & an audio connection.
Beyond the complimentary web-based training, sessions are for purchase only. These additional sessions range from $350.00 to $2,000.00, depending on whether you purchase a web-based lesson or an on-site training.
For more information, or to schedule your complimentary training, please e-mail training@gigatrak.com or call us at 262-657-5500 ext. 112.
Question: Does it matter how I set up Facility and Location or Classification and Type in TTS?
Answer: The bottom line in setting up basic definitions (RE: Facility/Location and Classification/Type) is, at the end of the day, it boils down to how the information is searched for and need to be presented when the reports are generated.
The standard reports basically sort out based on Facility/location, classification/type and employee.
Your other key search options are from the Tool Find function screen….. use the dropdowns to search and sort. And, note, the
– Binned items: Information for “Non-Consumables” is included in the standard reports. Information for “Consumables” is included in the 5 Consumable reports:
Question: On the download page, there is a clear button. Pushing this clear button does what? I I’m not sure if it “un-does” all of the check-outs even after I’ve “COMMIT” them. I just don’t want to wreck anything up so I just left it.
Answer: I had the same trepidation when I first selected this button. It does exactly what it says……it “Clears” the screen of all transactions that have been uploaded (imported) from the hand held from this screen; whether they’ve been Committed or not.
Not a problem if they’ve been committed; as they’re no longer needed on this screen and you don’t want the screen clutter. And, the transactions uploaded from the terminal are still on the terminal – they won’t be overwritten until a new “Export” pushes the updated data to the terminal (IE., Import, Review, Commit, Export updated file).
So, make sure that first you SAVE your work (in case you’re interrupted in the middle of reviewing the transactions). Then, make certain, when your review of the imported/uploaded transaction is complete, to select the COMMIT button to merge the data with the main database. (‘SAVE’ only saves the review in progress, it does not merge the data with the database). Only COMMIT will merge the transactions you’ve checked; those unchecked will still be awaiting review.
Once ALL transactions have been COMMITTED, you can “Clear” the screen for the next time around. You can, also, if there’s a bit of paranoia about a new software, print a report from the Download window, before you “clear” the screen. That will give you a backup hard copy or electronic document.
Question: I’m trying to enter Employee barcodes, but I keep getting a message on one barcode that it is in use. There is no other employee that has that barcode.
Answer: Every barcode in the system is unique. That includes location, employee and part, asset, or inventory number. Check and see that the same barcode you want to use for the employee is not already in use as a location, part, asset, or inventory number.
Question: How would I run a report on employee to see if they were made inactive and then reactivated, then on what days this was done?
Answer: History is maintained ONLY on assets or tools, NOT on employees.
Question: I’m trying to pull up an item record, but it either errors out, or is missing a file attachment or image?
Answer: The problem may be, if you are on a “networked” GigaTrak solution, that someone has “re-located” the image or document file on the server. So, the application is trying to pull up the record, but that particular link is now missing.
Question: I’ve set up my file import template, using an Excel template; however, Excel keeps changing some of the larger cell values into scientific notation.
Answer: To prevent excel from switching each value to scientific notation when data is entered, it may
be necessary to re-format each cell to ‘TEXT’. To do this:
Select all of the cells in the data file.
Then, using the dropdown under the HOME tab, switch them
from GENERAL to TEXT before entering numbers.
For more details, reference document Eliminate Scientific Error in Data Import .
This document can be found on the Client Center website, under the “Supplemental
Information Section” of the product you’re running.
Question: How do I update my GigaTrak application?
Answer: If you are within the initial warranty/purchase period, OR, you have a current support contract, it’s simple to update your GigaTrak software application.
– From your PC workstation, Log on to the application as the Administrator (If you don’t have the Administrative credentials, you’ll need to obtain these from the original License Key email or by calling the GigaTrak support line and requesting them. You’ll need to have authorization for these credentials.)
– Select the HELP Text tab from the top menu bar
– Select ‘Check for Updates’, and follow the prompts/instructions
If you are prompted to contact tech support for the update, that number is: 262.657.5500
If your support contract has expired, you can also contact the support number to update that service.
Question: I’ve noticed that my Intermec terminal doesn’t respond consistently when the carriage return key is depressed or a barcode is scanned.
Answer: Verify the suffix “\x0D” is properly set in the terminal configuration / barcode utility.
To do this, go to the GigaTrak Client Center to download the configuration doc:
Under the Hardware heading, Select Handhelds
Under the Handheld section, Select Intermec
Under Handheld User Documentation,
Select the appropriate terminal model
Follow the directions to enable to suffix in the document section:
Append Carriage Return to Barcode Scan
If this doesn’t resolve the issue, the unit may be running an older version of Windows OS that responds differently to the carriage return than newer versions. Some older models of CK3 and CK71 terminals may exhibit this behavior.
This scenario can be addressed by: 1) upgrading the app to CF 3.5, or 2) using a custom configuration file for the Intermec Virtual Wedge.
Simplest – Selection 2: From the GigaTrak Client Center, download the config file:
Under the Hardware heading, Select Handhelds
Under the Handheld section, Select Intermec
Under Handheld User Documentation, Select VW Configuration file
Download this file to your workstation.
Unzip and copy the VWconfig.ini file to the \Windows folder on the
Intermec device.
Reboot the device.
If the issue isn’t resolved, contact the GigaTrak Technical support team: 262.657.5500
Question: My mobile/handheld terminal is not connecting to PC via USB cable; so, I can’t download the GigaTrak application. It also will not connect via the GT application Download function to synch data.
Answer: Typically, one end of the USB cable should be connected directly to the docking station for the handheld and the other to the USB port on the PC workstation. For some handheld mobile computer models, when the USB connects to the PC and then to Power, it only charges the unit. (There are some terminal manufacturers’ models that do allow for direct connection to the PC; please confirm what connectivity your model requires.)
That being said, connecting the HH to the PC is seldom an application issue; it’s usually hardware-related. The issue may be as simple as the ‘driver’ for the handheld needs to be downloaded and installed on the workstation. When the handheld is initially connected to the PC, typically, a ‘driver installing’ message will appear on the PC screen.
It’s also possible there is a conflict on, or among, the workstation’s USB ports. This is particularly possible if there are multiple USB ports on the PC, OR, if one of the USB ports is also supporting or connected to another terminal or device.
If none of the above issues seems to be the case, below are some commonly suggested resolutions to try:
- Make sure the USB / Comm port communication application is installed on the workstation. This will be either ActiveSync or Windows Mobile Device Center. Which one you have will depend upon the PC’s operating system. If the app was just installed, the computer may need to be restarted to clear the USB port and establish connection.
- See if the workstation can see the handheld device in ‘Devices and Printer’. If not, make sure all cables are plugged in properly.
- Try a different USB port.
4. If running Windows 7 or higher, open Windows Mobile Device Center.
– Verify “Allow USB Connections” is checked off.
– Check “Allow connections to one of the following:”
- Sometimes undocking the Handheld, changing the settings, and then
changing it back to the DMA or COM1, then re-docking does the trick.
- Verify the PC Connection on the Handheld is set to USB.
EX: This setting for the Skorpio is in:
My Device> Control Panel > PC Connection
- Perform a warm boot (see device manufacturer’s instructions, or handheld ‘quick info’ document).
8. Perform a cold boot (see device manufacturer’s instructions, or handheld ‘quick info’ document).
In some cases, more than one issue is preventing the connection from being established, so it can be a little difficult to resolve the issue. If none of these options resolve the issue, contact either GigaTrak’s tech support group or the manufacturer’s customer service number for additional support.
With the purchase of any software application, GigaTrak provides 90-days of support that provides you with any technical help as well as any software updates during that period. Beyond the 90 days of support, users must purchase 1-year support agreements. Please contact our support team for more information regarding your support situation. They can be reached via e-mail at support@gigatrak.com or by calling 262-657-5500 ext. 2.
Question: How can I check the container or binned item once I have a tool in the system? What is the difference between the two?
Answer: You can’t change a Container or Bin status once a tool is Saved.
You can ONLY set the Container or Binned item check box when you CREATE the tool initially. Once a tool is created and SAVED, the container and binned item check boxes are not editable fields.
Essentially, a ‘container’ is something you put items in. Could be a semi-trailer, a pallet, a toolbox, a work van, a shipping container, a safety “kit” (or any type of “kit). You can then check a Container out to a Person or Location.
A ‘binned’ item is also considered a ‘quantity’ item. These are items that don’t warrant placing a barcode on each item, as they aren’t really ‘unique’. So, you set up a “single” barcode to identify a group or quantity of tools. EX: 12″ claw hammers (25 in a bin , all identified by the same part number). 50’ electrical cables (again, a bin of 100 cables, all identified by the same barcode).
The 2nd choice under the ‘binned’ category is to determine if these items, when checked out, are supposed to be returned. This would make them “non-consumables’ (or, consumables ‘no’). These could be checked out, but would also be expected to be checked back in.
Or, perhaps they will be used up on a job, such as personal items as safety glasses, or gloves. This would make them ‘consumables’ (or, consumables ‘yes’). Once check out, they would not be checked back in.
NOTE: Container is only a field in TTS. It is not available in ATS.
Question: How do find what tools are in a Container?
Answer: Several options are available to generate reports for reporting on Tools or equipment
assigned to a container.
See what Tools are currently check out to a Container
Option 1: Find Tool Function
1. Select the Tool Function
2. In ‘Other Search Field’ drop down, Select ‘Assigned to Container Barcode’
3. From the next Field, ‘Other Search’, Select the 3-dot box
4. Select the Container from the resulting list
5. Select the ‘Extract Data’ button : A list of tools of all tools currently
checked out to that container will preview
6. Select the “Print List” button to preview the Container list
Select the “Print Barcode List” button to preview the Container list that
includes tool barcodes.
All print previews can then be printed as: hard copy, PDF, or Email
Option 2: Run a Report
1. Select the Report Function
2. Select Tool Assignment by Container in the Report list
3. Select the desired filters – this includes the Container
4. Select ‘Print Report’
The report preview will show the container name and all tools currently checked out to that container.
All print previews can then be printed as: hard copy, PDF, or Email
Question: How do I easily “move” a group of tools from one Employee to another Employee; or, from one Location to another Location?
Answer: You can move a tool or group of tools from Employee to Employee; Location to Location; Employee to Location; or, Location to Employee.
To move from Employee to Employee:
Select the Check In/Out Function | Select Check Out (F1) function | Select Employee Select Employee Barcode
Select the Tool Barcode Description box From the Find Tool Screen, Select “Other Search Field” | Select ‘Assigned to Employee Barcode’
Select the ‘Other Search’ box to bring up the Employee listing | Select Employee Select Extract Data to bring up a listing of all tools the Employee has assigned
Select all the tools listed as checked out to that employee, or only the tools you want to check out to another employee
Select OK Select Save, or Save/Print to check out (or move) the tools to the new Employee
To move from Location to Location:
Select the Check In/Out Function | Select Check Out (F1) function | Select Location Select Location Barcode
Select the Tool Barcode Description box From the Find Tool Screen, Select the “Location” drop down field
Select Extract Data to bring up a listing of all tools assigned to that Location Select all the tools listed as checked out to that Location, or only the tools you want to check out to another Location
Select OK Select Save or Save/Print to check out (or move) the tools to the new Location
To move from to Employee to Location:
Select the Check In/Out Function | Select Check Out (F1) function | Select Location Select Location Barcode
Select the Tool Barcode Description box From the Find Tool Screen, Select “Other Search Field” | Select‘Assigned to Employee Barcode’
Select the ‘Other Search’ box to bring up the Employee listing | Select Employee Select Extract Data to bring up a listing of all tools the Employee has assigned
Select all the tools listed as checked out to that Location, or only specific tools
Select OK Select Save, or Save/Print to check out (or move) the tools to the Location
To move from Location to Employee:
Select the Check In/Out Function | Select Check Out (F1) function | Select Employee Select Employee Barcode
Select the Tool Barcode Description box From the Find Tool Screen, Select the “Location” drop down field
Select Extract Data to bring up a listing of all tools assigned to that Location Select all the tools listed as checked out to that Location, or only specific tools
Select OK Select Save or Save/Print to check out (or move) the tools to the Employee
Question: How do I add tools with the handheld mobile terminal. The screen is asking for a Master item scan, but when I scan the tool barcode, it’s rejected.
Answer: First, set up ‘Master” (or “Catalog”) items (templates) from the “Master” (or “Catalog”) function in the TTS (Tool Tracking application). Then, print out a copy of the Master (or Catalog ) items by selecting the “Print Barcode List” button from the “Find Master” (or “Catalog”) screen.
When you wish to add a tool, simply locate the Master (or Catalog) item on the printed list, then scan the corresponding barcode into the Master field on the handheld terminal. Then, you can scan the new tool barcode. The asset and serial number fields are optional.
You will then, once the added tool transactions are uploaded to the main TTS database, need to make any additional tweaks to the tool record. This includes assigning a Storage Facility and Storage Location.
When installing the PC system, the setup prompts ask you to select between an SQL and Access Database. Please visit your system’s page on the Client Center portion of our website to learn about the differences in databases. The document entitled “Access vs. SQL” is there to help make your setup decision. If, after reading, you still have questions, please contact our support team for further explanation. They can be reached Mondays-Fridays, 9:00AM-5:00PM CST via e-mail at support@gigatrak.com or by phone at 262-657-5500 ext. 2.
Question: I need a list of the items that have been assigned to a container. How do I generate this?
Answer: There are a couple of ways to generate a printout or report for items that have been assigned or checked out to a Container. Either from the Tool Find screen (containers are only an option for assignement or check out in TTS); or, from the Report Function.
- From the ‘Tool Find (F1)’ tab/screen:
SELECT the drop down arrow at the “Other Search Field” box
SELECT ‘Assigned to Container Barcode’
Notice that the following box, “Other Search”, displays an ellipse (3 dot) box
SELECT the ellipse box
A window pops up with a listing of the Containers that have equipment assignements
DOUBLE-CLICK on the container for which you wish to obtain a printout
SELECT the ‘Extract Data’ Button
SELECT the ‘Print List’, ‘Print Barcode List’, or ‘Export List to File’ Button, depending
upon what type of report is required
- From the ‘Report’ Function:
Scroll through the reports and SELECT the ‘Tool Assignment by Container’ option
Choose the Report Filters
SELECT the ‘Print Report’ Button
Upon purchase of your system, you will have received an e-mail with installation instructions for your system. The e-mail will contain a zipped folder that you will need to download and unzip for installation. This folder will contain the setup file for the PC application that you purchased. You will need to run this setup to install the application onto your computer or network server.
Additional help can be found by visiting your system’s page on the Client Center portion of our website or by contacting support. The support team can be reached Mondays-Fridays, 9:00AM-5:00PM CST via e-mail at support@gigatrak.com or by phone at 262-657-5500 ext. 2.
Upon purchase of your system, you will have received an e-mail with installation instructions for your system. This e-mail will contain a zipped folder that you will need to download and unzip for installation. This folder will contain the setup file for the handheld device that you purchased. After connecting the handheld to your PC, you will need to run the setup for the handheld.
Additional help can be found by visiting your system’s page on the Client Center portion of our website or by contacting support. The support team can be reached Mondays-Fridays, 9:00AM-5:00PM CST via e-mail at support@gigatrak.com or by phone at 262-657-5500 ext.2.
GigaTrak offers a full range of maintenance and repair services for all hardware that we sell. This includes No-Fault replacement plans. If you begin to experience issues with your hardware devices, please contact our support team for further help. They can be reached by calling 262-657-5500 ext. 2 or by e-mailing support@gigatrak.com.
Upon installation, you are ready to begin entering data and implementing the system. First, visit your system’s page on the Client Center portion of our website to access the user’s manual for your system. The user’s manual will walk you through all the functions of the application. Next, schedule your complimentary training session to learn more useful information regarding the setup of your system. Training sessions can be scheduled by e-mailing training@gigatrak.com or by calling 262-657-5500 ext.112.
Question: I’m following the directions to install the GigaTrak client on the mobile handheld terminal, but the instructions are asking me to look for some installation files. I.E., drvupdate-x86.exe, etc. I have no idea where these are.
Answer: When the original GigaTrak download link was provided, (the one the main software was installed from) was sent to your company, it was in a “zipped” format. When files were extracted from this zipped file, several directories would have been created:
They may have been:
\ActiveSync & WMDC
\Doc
\Handheld
\SQL Server Scripts
etc., ………..
The files you need to install the ‘communication’ software (this software allows the handheld terminal to connect in ‘batch’ or ‘cabled’ mode to the PC workstation) will be located in the
\ActiveSync & WMDC directory.
If you don’t have access to the original files, this is available from Microsoft’s website.
The file(s) needed to install on the mobile handheld terminal GigaTrak client will be located in the\Handheld directory
If you don’t have access to the original files, you will need to contact the person in
your company who originally installed the product; or, contact GigaTrak Tech support:
262.657.5500
Question: How do I Repair my Access Database if it becomes corrupted?
Answer: How do I Repair my Access Database if it becomes corrupted?
Question: How do we see what containers are currently assigned to Jobsite?
Answer: Several options are available to generate reports for reporting on ‘Locations’, which is
typically what Jobsites are considered to be…..
See what Containers are currently checkout to a Jobsite
1. Select the Reports button
2. Select Tool Assignment by Location in the Report list
3. Select the desired filters – this includes the Location/Jobsite
4. Select ‘Print Report’
This report will show the container currently checked out to the Jobsite
Question: How do you print the list of tools an employee has out with the barcodes?
Answer: From the Tool Function | Tool Find (F1)
For Location: Select the Facility (optional) and Select the Location
Select Extract Data
Select Print Barcode List
For Container: From “Other Search Field”, Select Assigned to Container Barcode
From “Other Search” field, directly below
Click on the ellipsis box | Select the Container
Select Extract Data
Select Print Barcode List
For Employee: From “Other Search Field”, Select Assigned to Employee Barcode
From “Other Search” field, directly below
Click on the ellipsis box | Select the Employee
Select Extract Data
Select Print Barcode List
Question: I can’t delete locations. When I try, a message box pops up that the location has been used for tools/assets and cannot be deleted. How do I remove locations that are no longer needed?
Answer: History is maintained on all items; but, there is the option to Delete it. It’s somewhat of a ‘stepped’ process. Item History records tied to that location must first be deleted.
It’s advisable to ‘inactivate’ the location, rather than deleting it. This is because a Delete requires that ALL tool history, whether it is tied to that location or not, be deleted; thus, affecting any other locations that have history pertaining to that tool/item.
In TTS or ATS, Select FILE | SETUP ; Select the Application Settings Tab, then Select the ‘Allow Delete and Purge History’ box:
Determine what tools/items have “history” at the location you wish to delete, then ‘purge’ that tool’s history. (You have the option to be selective about the “up to” date range for the purge.) Once all tool history tied to that location is deleted, you’ll be able to delete the location.
CAUTION: The purge options allows you to specify an ‘up to’ date range; there is NO option to be selective about specific dates, or specific locations. So, ANY/ALL tool history pertaining to other locations, or employees will also be removed with the purge. ALL TOOL HISTORY in the selected date range will be deleted and non-retrievable.
Question: I can’t EDIT the Bin or Container box on the Tool Information Screen:
Answer: Once ‘saved’ as a Binned or Container item, ALWAYS a Binned or Container item. All other items on the Tool Record screen are editable, EXCEPT for Bin and Container.
This applies to the Master as well (simply a ‘template’ for creating individual or binned or container tools). However, when the Master is pulled in to the Tool record and used to create the tool item, until the tool record is “saved”, bin or container can be changed.
Question: I have ATS (or TTS) and there is data in my database that I want to delete, but I don’t see any option to do so. How do I get rid of (delete) it?
Answer: To prevent accidentally “deleting” or “purging” data records (from which there is no recovery if you haven’t maintained regular data backups, Delete is a function that has to be enabled. To do this, if using ATS or TTS:
Select FILE Tab | Setup Options
(You must have, and logon with, the Global Logon information to access the Setup Options Menu.)
From the Applications Settings Tab, Select Allow Delete & Purge History
(You will now have a Delete Button available on various screens.)
NOTE: Some items can only be deleted if they have no history (check in, out, locations with tools, assets assigned, etc…..) attached to them. If there is data attached to an item, you will first need to remove or delete the lower level information before you can delete the item.
Example: You want to delete a “Location”, but a tool(s) has been assigned to it, and a message pops up that indicates the “Location” can’t be deleted.
First, locate the tool(s), and Delete that tool(s):
If the tool(s) has history attached to it….. it’s been used, checked in/out, etc., you’ll need to go to the Tool History screen and “Purge” its history.
Then you should be able to Delete the Tool.
Then you should be able to Delete the Location
CAUTION: Once deleted/purged, the data is NOT retrievable (unless you’ve maintained regular backups and restore it).
For ongoing use, the recommendation is to use the ACTIVATE/INACTIVATE setting options instead of Delete/Purge. An item no longer required/used can be Inactivated, so it can no longer be used. You can “Activate” it again, should that be necessary. With this process, historical information on the item won’t be lost.
Question: I have data in my database that I didn’t enter, such as in the Funding and Account fields. Where did this come from? How do I get rid of it?
Answer: It sounds like you installed the software with the demo database instead of a blank database.
- If you have just begun to enter data, you could start over with a blank database. One of the following will be in your installation folder, depending upon the product you’ve installed: win_tts_clean.mdb, or win_ats_clean.mdb, or win_sts_clean.mdb.
Simply copy the clean DB and rename it, depending upon the product you’ve installed, to win_tts.mdb , or win_ats.mdb, or win_sts.mdb. Then, restart the application.
2. If you have begun entering data and there’s too much to begin again, you can Enable the Delete/Purge option from the FILE Tab | Setup Options menu……. Then you can go through and manually delete the unwanted records.
(You must have, and logon with, the Global Logon information to access the Setup Options Menu.)
Question: I’m getting an “Invalid Cast Exception” error on my mobile, handheld terminal when I scan
my employee barcode to access the GigaTrak application. My time and date are set correctly, and match the time and date on my PC workstation. What is causing this error?
Answer: An invalid cast exception error will occur on the handheld if the short date format is not set
correctly on the handheld. It must be set as follows (these instructions are for the 6100 terminal instructions may somewhat differ for other models, but the premise is the same):
Set Short Date Format
1) In Control Panel, select Regional Settings.
2) Tap the Customize button.
3) Select the “Date” tab.
4) Set the Short Date Style to “MM/dd/yyyy”.
5) If the “Date Separator” is not the “/” character, select the Date Separator box.
6) Select the “/” character from the drop-down list (or type it in using the on-screen keyboard).
7) Tap the “OK” button at the top of the screen.
Question: I’m using the handheld terminal, but when I scan all my data, the fields don’t advance, and I can’t enter information for additional items.
Answer: Question: EX: I’ve
· Entered my barcode
· Choose CHECK IN
· Scanned the asset
· Screen came up with Asset Barcode, it showed who it was assigned to
and which Storage location it belongs to.
The options I available to get out of the screen are: Back to Menu and RESET. That’s it. I also says 0 data records.
How do I get out of that screen and move on to the next asset?
Answer: It sounds like the handheld scanner is not appending a carriage return to the end of the Scan; so, the fields will not automatically advance. To manually advance to the next data field, Press the Enter key after you scan a barcode.
To make the scanner “Auto Enter”, you’ll need to refer to the Hardware Quick Start or Setup document that was provided with your system. There are instructions there for setting up the scanner “Auto Enter” feature. (This is typically referred to as “appending a carriage return to a barcode scan.)
Question: I already have a exsiting database, electronic version, of my tools (or assets or inventory). Is there an easier way to enter this information, as opposed to adding all this data directly from the Tool Information (or asset or part inventory) screen?
Answer: If you already have your information in electronic format and can port it to a ‘tab-delimited’ file, you can use the “Import Tools” (or Import Assets or Import Parts) option. This is located under the FILE Tab Menu. (There are also sample, pre-defined, import file samples posted on the GigaTrak Client Center webpage.) Log on to the Client Center webpage, then go to the particular GigaTrak application section that applies.
From the “Sample Import File Text”, select the file version that applies to the software version you have.
Question: All the “Classification” fields in my TTS database only indicate “Unassigned” since I imported my existing data. Why?
Answer: The class gets set to “(Unassigned)” because the ToolWatch ® data only has “types”, no classes. You can easily map your types to new classes if you want to by going to the SUPPORT Menu Tab | Tool Support Administration Screen.
Create your Classifications; then go to the Type Tab and assign your type(s) to the desired Classifications.
Question: I want to update data on tools already in the TTS database. Do I HAVE to do these one at a time from the Tool Information screen?
Answer: Version 1.11.5 added an “Update Tool Data Export/Import” function on the File menu. It allows the user to export current tool data to a tab delimited txt file and import it into a spreadsheet for modification. Save the changes back to a tab delimited txt file and import it on this screen. The tool data will be updated.
This screen will only update existing tools, it will not add new tools to the database.
Implementation begins by planning out the setup and organization for your system. GigaTrak offers several resources that aid in this phase of implementation. Please visit your system’s page of the Client Center for more documents and information regarding implementation.
For additional help with setup and implementation, contact our training team by e-mailing training@gigatrak.com or calling 262-657-5500 ext. 112.
Question: Is there a way to check all the tools that are assigned to one employee (or) location straight to another employee (or) location without having to scan each tool out individually?
Answer: No and Yes.
From Employee to Employee, there’s no direct way to check out tools from one employee to another.
But, you could assign a specific group of tools to a “Container”. Then, you could check out the container from one employee to another.
From Location to Location (or) Location to Employee, you can check out a group of tools:
To do this, from the Check Out Function on the PC application:
Select the Location or Employee radio button.
Select the Tool Barcode description button.
From the resulting Tool Find screen, from the Location drop down field,
Select the Location you want to move tools from. Hold down the CTRL button on your keyboard and select the tools you wish to move by clicking on them with the left mouse button. (this will highlight all you wish to move). Once all are selected, Select the OK button on the Tool Find screen. All the selected tools will now be in Check Out grid.
Save or Save & Print to complete the transaction
Question: I have images set up for my asset/item/tools in the Asset Information / Tool Information screen; but, on the Find Asset / Find Tool screen, the image is missing?
Answer: When the Asset or Tool is initially ADDED, and an image is attached with it, a thumbnail image is also created. This is an abbreviated version of the image and is used on the Asset or Tool ‘Find’ screen.
If the image is moved from the original image folder, and the thumbnail is not also moved to the new image folder location, the image will be missing from the Asset or Tool Find screen. If you look in the image folder/directory, you’ll notice the different image versions.
EX: image computer.jpg
thumbnail t_computer.jpg
Question: I’ve got 41 computers and 41 monitors … 56 small file cabinets, 70 chairs, etc. Do I have to input each and every one? How can I print a group of labels that say the same thing …… 33CHAIR?
Specifically, for example, how do I get the data base to store 70 labels, from 33CH50 to 33CH120 … without having to go through and create the barcode label 70 times, once with each new number? Can I put in 70 numbers at once if they are consecutive?
Answer: There are several ways to effectively barcode items:
- Use a single identifier (barcode) for items of which there are many of the same type/kind.
But, make the item a “binned” item (a check box on the item itself when it is created).
- You can either put the same barcode label on each item, or simply have a laminated, binder sheet with the barcode label that identifies the item(s). All binned item barcodes could be stored in the binder. Then scan the barcode from the binder upon check out/ check in of the item.
- Create the ‘individual’ record, including barcode, for the first of the items. Then, use the COPY Button to automatically generate each additional item record. The Copy function allows you to copy a prior asset record. It only takes a few seconds if you want to individually label each with a unique barcode.
EX: Enter the first chair and print its label. Then press the Copy button. It will blank the serial number, so you could record the next serial number (if needed), and then automatically record the next barcode upon save. Print the next label and you are done. 5-10 seconds for each entry is typical.
- Individually, name ( ID ) and barcode each item. This will take a bit more time, as each will now be an individual, unique item.
If the product you’re using is ATS, once individual items have been created, you could use the Label Function (Label Text Tab Menu at the top of the ATS screen):
Select Label Setup | Select Asset |Select Print Label Sequence to print out a group of labels.
Based on the question’s example, use the Prefix Field for the group identifier (max 3 characters). For example, CH. Then use 50 as the starting point, and 70 for the quantity of labels. Make sure you have a label printer for this that can handle consecutive label printouts. A standard printer will likely only print one label at a time.
Question: I had a little bit of difficulty installing the printer. I plugged the printer in and powered it on. When I went to my devices to see if the scanners were connecting, I saw it on my printer list. It looks like it downloaded itself. Should that have happened?
Answer: Typically, on newer Windows workstations, the printer driver will auto ‘magically’
install.
- At this point, you may only need to go to the FILE Text tab in the GigaTrak PC application and Assign the Printer. This is done from the FILE text tab that is located towards the upper left corner of the application screen:
FILE tab | Printer Assignment | Assign Barcode Printer
Highlight the barcode printer | Select ‘assign label printer’
- Sometimes, once the media and ribbon are installed (or when this is performed subsequently in the future), the Zebra ™ printer may require calibration…… a couple of ways to do this:
– Software… Use the Zebra ™ utility – this can be downloaded from
Zebra’s ™ website
– Manually…. Reference page 85 of the Zebra Manual ‘TLP2824 Plus User Guide’
that can also to be downloaded from the Zebra ™ website. Supplementary
support guides for the printer and calibration are also available on the GigaTrak
website in our Client Center.
Select Hardware | Printers
Select Zebra (Printer listing on left of web
Question: Is there any way to get a barcode list printed when I check items out to a Container?
Answer: You have the option to print out a ‘container’ barcode list from the Find Tool Screen:
In Other Search Field, Select Assigned to Container Barcode
Enter the container barcode in the Other Search textbox
Select Extract Data
This will pull up all items checked out to the container.
You can then print the Barcode List.
Question: How do you print the list of tools an employee has out, along with the barcodes?
Answer: You can obtain a report, listing all the tools an employee has out, from the Report module screen. Currently, there is no option to print this report to include tool barcodes. You can print tool barcodes, separately, from the Tool Find (F1) Screen.
Question: Is there any way possible to view the notes section in the reports? For example, if I put the name ‘Customer Jones” in the notes how can I view when viewing reports?
Answer: The ‘Received Notes’ should be a column in both the main and history grids. If it isn’t visible, right-click the column header, and select column chooser. You should see ‘Received Notes’ as an available column in the blue box. Drag it from the blue box to wherever you want it in the grid. The application will remember the layout.
The reports print exactly what is in the grid, so this way, you can adjust the output of the report.
Question: I’m trying to put locations in the system that say B1-01 and it keeps bouncing back saying unknown location….what can I put so it won’t say unknown location?
Answer: Assuming you’re trying to enter B1-01 on the handheld, it must have been added on the PC first, then synced to the handheld before the handheld knows it’s a valid location.
Question: Is there a way to check all the tools that are assigned to one employee straight to another without having to scan each tool out individually?
Answer: No, not a “group” of tools; but, if you assigned the tools to a “container”, then checked the container out to an employee, you could check the ‘Container’ out from one employee or location, directly to another employee or loction, by only scanning the container barcode.
Question: How do we have GigaTrack display a report, verses only having the option to print the report? We want to run a report and have it simply pop up on the screen for informational purposes
Answer: In the report function, Select a report:
The report preview will display first on the screen.
You then have the following options:
1) Print a hardcopy (make sure you have an assigned printer:
File text tab | Printer Assignment function);
2) print an electronic or PDF version
3) print via send through email, if you’re system is using MS Outlook
as the email server.
Question: How do we create specialized reports, specific to our needs and information request
Answer: GigaTrak’s software group can always provide custom reports for users. This
is a fee- based service. You only need provide the exact report format (layout
and information required) and submit the request to the software support
group. They will review the request and provide pricing.
Or, if the default Reports available through the Report function are not sufficient, there is also the option to FILTER through and search for the data required from the Asset Function | Find Asset function.
Information generated from this directed search can be printed in two forms: as a Barcode List (Print Barcode List), or as a Grid Listing (Print List) of the data from the search.
The resulting search also allows for the Export of information in the resulting search grid to a CSV file. This CSV file could then be used to generate additional report formats through Excel or some other 3rd party option.
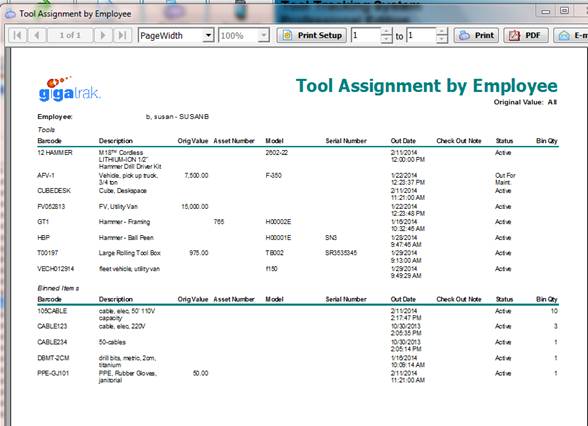
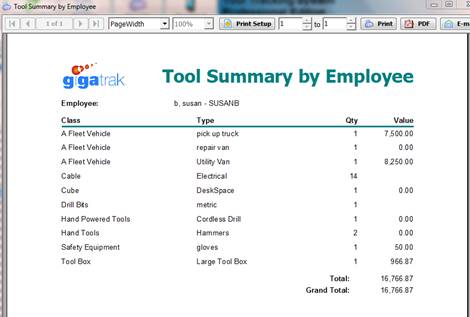
Question: I have employees that are issued tools and they check out tools. I want to provide anyone that has tools checked out, a list of those tools. Can you provide this type of list?
Answer: You can generate and print out reports for tools check out to ALL employees or a SINGLE employee. All of the reports provide the option to Print hard copy, Generate a PDF (electronic version), or email through MS Outlook, as long as your network configuration allows this:
Tool Assignment by Employee (you can select ALL or a single employee):
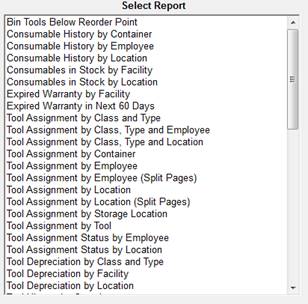
Print hard copy, generate PDF or email:
Tool Summary by Employee (you can select ALL or a single employee):
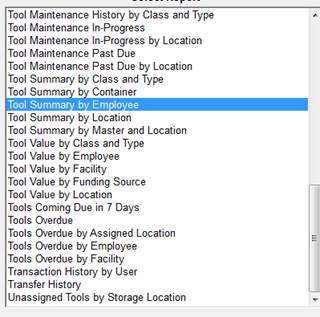
Print:
Question: I was under the impression that the SQL software was included in with the GigaTrak software?
Answer: There is a free version downloadable from Microsoft ™ SQL Express is all that is needed. We provide the script files and instructions you will need to set up the database for the GigaTrak application.
Question: Where can I add a storage location to a tool? When under the tool information (F2) section of the tool tab, I have cells populate off the drop downs EXCEPT storage location. I am trying to create just 1 working tool search and I keep getting the message that a storage location needs to e selected. I have gone to the location and facility maintenance tabs under support and just can’t seem to get past this.
Answer: This is pretty straightforward. You can add storage locations from the Tool Information window, or if the initial location is “unassigned”, you can select the tool (or tools) from the Find Tool screen, and re-assign it.
NOTE: First, you must have facilities and ‘storage’ locations defined, either by Importing the data files (FILE Tab menu | Import | Import Locations); or, by setting them up from the SUPPORT Tab menu:
Select Support Tab | Select Location Administration | Select Add
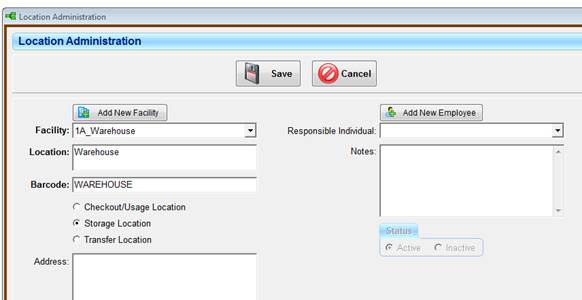
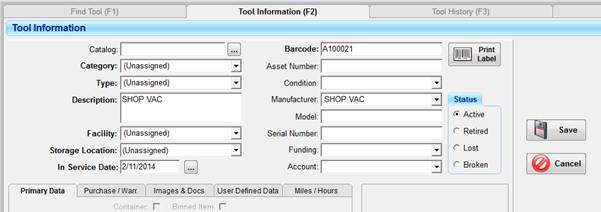
To set the Storage Location from the Tool Information (F2) Screen:
From the Tool Information screen:
Select EDIT, then Select the Facility drop down (pick the facility),
Select the Storage location drop down (will tie back to the facility you selected),
Select the storage location
SAVE
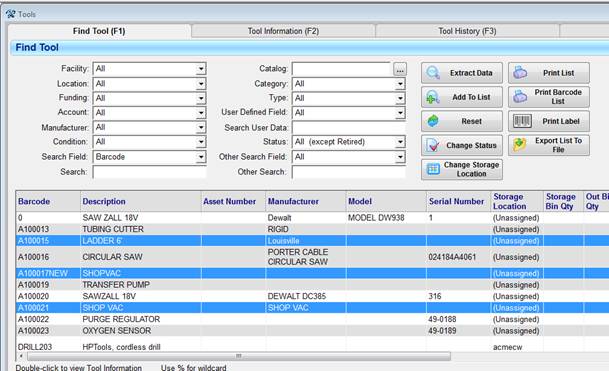
To set the Storage Location from the Find Tool (F1) Screen:
From the Find Tool Screen:
Select the Tool (or tools) by selecting the tool (subsequent tools can be selected by holding down the Control key)
Select “Change Storage Location”
Question: I’m trying to check out some inventory on the handheld mobile terminal, but the fields that need to be filled out seem to keep changing. Why?
Answer: STS provides for configuring certain data requirements for each inventory item. These options depend upon the version of STS you are using, and can include: Serial Number, Lot Number, Expiration Date, Work Order & Account Number.
So, depending upon whether or not these options are required for an inventory item, these fields may or may not appear in the Check Out or Return function fields for that item. (This is true if the item is checked out or returned from either the handheld mobile data terminal or the main PC STS application.)
Question: I’ve collected “Return” inventory, using the handheld data terminal, but when I synchronize the transactions with the STS application, I don’t see these inventory transactions in the Part History function?
Answer: STS does not record ‘Check Out’ or ‘Return’ transactions in Part History. These transactions only appear under the ‘Checkout / Return’ history function.
Question: I have already set up my system with Equipment/Tools. What is the Master (or Catalog) function used for? It looks like just a duplicate of the Tool Function.
Answer: The Master (or Catalog) icon is an easy way to set up a “template” for tools. The template allows you to set up all the basics of a tool ‘group’. Then, you simply go to the Tool Function to add each ‘uniquely barcoded’, or ‘binned/quantity’, or ‘container’ item.
The tools added from the Tool Function, using the Master (or Catalog) template as a basis, allows one to create tools quickly with consistency (with standard naming convention, description and standard image or document items).
Question: When I am in the Add Tools function on the Handheld terminal, a message pops up that the new tools added won’t be usable until the terminal is downloaded to the PC application. But, then I get a screen that looks like it allows me to check out that new tool? Is the message an error?
Answer: You can “add” new tools on the handheld terminal and use them immediately…..assigning them to a person, location or container. The message is only cautionary, because, until the handheld terminal is synchronized with the PC application, those tools won’t be visible to the entire system.
Question: Is there any way possible to print out a barcode list of all items assigned or checked out to a Container? We need to be able to place the list with the container, so that if labels on the items are damaged or missing, we still have some way to identify and check them in.
Answer: You can print a “Container” barcode list from the Find Tool screen:
Select the Tool function icon
From Other Search Field textbox drop down, Select Assigned to Container Barcode
In Other Search textbox, enter the container barcode
Select the Extract Data button
This will pull up all items checked out to the container.
Select the Print Barcode List button to print a barcode listing of items in the container
Question: We imported our asset data, but we didn’t have all the information to fill in all the data in the beginning. How do we update the existing ATS files without having to manually Edit each and every one of them?
Answer: An easier approach to manual updates would be to utilize the IMPORT
UPDATE Function located under the File text tab in ATS.
To UPDATE existing asset/equipment data in the ATS database:
First, Export the existing Asset Data:
From the ATS application screen…….
SELECT the FILE Text Tab
SELECT ‘Update Asset Data Export/Import’
SELECT ‘Export Current Asset Data for Update’
This will export the current asset database information to a *.txt file
OPEN the *.txt file in Excel
SAVE it in Excel format
(this makes the columns and data easier to read)
Second, From Excel, Make any updates or changes to the file records
SAVE updated file as a *.txt in a directory on your PC
Last, IMPORT the updated file:
From the ATS application screen…….
SELECT the FILE Text Tab
SELECT ‘Update Asset Data Export/Import’
SELECT ‘Find File’…… find the file you just updated (*.txt format)
SELECT ‘Import File’
Question: User licenses exceeded’ message displayed with someone tries to log on; no one can log on, and no one knows who is logged in. How to we clear this error?
Answer: Your GigaTrak software is licensed per ‘concurrent’ user. If users log on and exceed the number of user licenses available, a message screen will pop up indicating “Maximum number of user licenses exceeded”.
When this error occurs, the screen that pops up will show the computer names that are logged in. Someone will then need to have access to one of those computers in order to exit an application session. That will release a license.
If you don’t have access to a particular computer, or are unable to determine where it is, there is a hidden function to sever all workstation/user logon connections to the GigaTrak database. Double-click on the GigaTrak logo on the screen message window that appears when this error occurs. A secondary window will appear requesting a password code from GigaTrak.
CONTACT GigaTrak Technical Support to obtain the Passcode to enter for this reset. The contact number is: 262.657.5500
Question: We have multiple sites and all our PC work stations run applications from the corporate server via “virtual” sessions. When we select the “Synch Data” button from the terminal “Download” screen, nothing happens. Help!
Answer: Our software uses MS ActiveSynch (Windows XP OS) or Windows Mobile Device Manager (Windows Vista or 7 OS) to establish the communications between the PC and the handheld, batch terminal. These communication applications typically don’t work directly with a virtual session, IE., Terminal Services or Citrix session.
You’ll may be able to set up a pass-through system, so that the physical port and drive (EX, USB) on the local PC can be passed through and recognized by the Virtual Manager. You may also be able to install the GigaTrak client application on the local PC, then point it to directly to the database on the host server.
If these options won’t work, you’ll need to use an alternative method to transfer the data. Please refer to our client website for documents on other options to transfer the data. If there is still an issue, please contact the customer support number (found on the HELP Tab Menu, under the “About” selection).
Question: We are working on getting it our GigaTrak software set up. Are there ways to customize the program?
Answer: Depending upon the program, there are various options to customize some data Fields and functions.
EX: the following are accomplished from FILE Tab | Setup Options :
ATS – allows you to rename the following fields:
Classification
Type
Facility
Location
Funding Source
Model Number
Serial Number
Condition
TTS – allows you to rename the following fields:
Classification
Type
Facility
Location
Funding Source
Model Number
Serial Number
Account
Condition
Master/Catalog
Additionally, you have to option to use or not, certain options, such as Depreciation, or auto-triggering certain reports after logon.
STS – allows you to:
choose between basic password security and enhanced password policy rename: Part and Manufacturing
choose to use, or not: work order / account number / serial number
set multiple approvals for Requisition approvals
Many other settings can be designated by the user the SUPPORT Tab dropdown.
Question: How do we change an item we have in the (ATS/TTS) database to a binned item? (When we edit that record it doesn’t allow that.)
Answer: You can’t. Once an item is designated as a ‘binned’ item, a ‘container’, or a ‘unique’ (neither ‘bin’ nor ‘container’) item, that designation cannot be changed.
You can edit any other data in the item record except for those designations.
So, If an item is ‘binned’, such as a group of wrenches, it’s always ‘binned’.
If a Ladder is given a barcode, and neither ‘container’ nor ‘binned’ are selected, it’s always going to be a ‘unique’ ladder.
Question: We have been working with our new GigaTrak software … testing with various data. Now that we are ready to go live with the system, how do we start with a fresh database?
Answer: If you’re uncertain as to how to access file directories on a computer system, or, are unfamiliar with how to access files on the handheld terminal, please contact our tech support group for support/instructions : 262.657.5500
If you are familiar with computer systems, instructions are below. Be aware, ALWAYS back up any files before deleting or renaming them. We cannot be responsible for lost files or data.
To start over with fresh data, we recommend you contact your IT administrator for backup assistance & support.:
A. Replace the ‘test’ database with a new one:
1.For an SQL database, reference ‘Manage SQL Database’, a supplemental document, that is available.
After the test database is removed, rerun the SQL scripts that were included with your software license download to create a new database.
2. For an Access database, reference ‘Manage Access Database’, a supplemental document, that is available.
B.IF using a mobile handheld terminal (batch) , the application ” *_mod.sdf ” file will need to be deleted from the handheld. The terminal will need to be re-synchronized and downloaded once your new database is populated. (This information is also documented in the Manage * Database support documentation.)
When you restart the GigaTrak application, the database will be fresh. You will need to logon as Administrator, reset all employee access, re-register your application and re-import or re-enter data.
Question: We were able to sync the data from handheld to the program on our PC; but after SYNCHING and SAVING, we have to select COMMIT to have the changes saved? Does the data on the handheld get erased? How do we erase it? We just want to make sure the handheld doesn’t lose our transactions.
Answer: When you “SAVE” the data (from the DOWNLOAD Function), this saves the working data you see on the Download screen. It does NOT save the data to the main database.
ONLY when the COMMIT Button is selected, is the data downloaded from the handheld terminal merged with the main application main database.
When you synch the handheld, the data on the handheld is removed from the handheld and transferred to the PC application.
IF you delete or clear the data from the Download window without selecting the Commit Button, the transactions previously uploaded from the terminal will be lost.
Once the data is Committed, you will need to re-synch the handhelds to transfer the new, current data set to them.
Once your support agreement runs out, technical assistance and system updates are no longer available. To renew your support agreement, please contact support@gigatrak.com or sales@gigatrak.com for pricing and payment.
Question: Bin: What is the purpose of the “Bin” designation in ATS/TTS?
Answer: Essentially, a ‘Bin’ item is classified as a item “grouping”. It’s an item that doesn’t require a barcode to be placed on it. It doesn’t need to be identified as a unique item/tool.
EX: could be a group of wrenches, a bunch of 6’ ladders, a box of work gloves, a drawer full of pencils, boxes of printer paper, etc. They’re not ‘unique’… a single barcode identifies the entire group.
Binned items can be either ‘Consumable” or “non-Consumable.”
“Consumable” binned items can be checked out, but, not checked in. Consumable items are NOT meant to be returned, but rather to be used up on a job or by a person. These could be gloves, water bottles, personal clothing, safety goggles, etc. This could also be reels of wire, network cabling, light bulbs…
“Non-Consumable” items can be checked out AND checked in. They are often those items considered to be of significant value, or extended use, so that they aren’t going to be consumed or used up on a job. These could be ladders (a 6’ ladder is a 6’ ladder is a 6’ ladder…), wrenches, hammers, buckets, power cords, etc….
Note: Once a tool is defined as a ‘binned’, item, it is always a binned item. This is not an editable field once the tool/asset is saved.
Regarding Reports:
‘Consumable’ binned items are CANNOT be checked back in. So, when the Check In function is selected, these items cannot be checked in singly, and they will not show up in the Checked Out listing if checking items back in by Group (Location or Employee). Additionally, in the REPORT function, consumables have their own Reports that can be generated.
‘Non-Consumable’ binned items CAN be checked back in. So, when the Check In function is selected, these items can be returned singley, or they will show up in the Checked Out listing if checking items back in by Group (Location or Employee). Additionally, in the REPORT function, non-consumables information will show up in the standard available reports.
The default username and password for the asset tracker login provide users with the most control over the system’s data. This username and password cannot be removed from the system, as it has full access over everything within the system. To sign in with this login, key in the following:
Username: admin
Password: adminuser
Other logins can be created by going to File – Employee Administration and entering a username and password for each new employee entered.
Class and Type are both used to describe the tools you have in the system. With the GigaTrak systems, classes and types are tied to one another in a hierarchy manner; Class is the “parent” and type is the “child”. An example might be as follows:
Class: Hand tools
Types: Wrenches, Hammers, Screwdrivers, etc.
Like class and type, facility and location are both used to describe the places where your tools are located. With the GigaTrak systems, facilities and locations are tied to one another in a hierarchy manner; facility is the “parent” and locations is the “child”. An example might be as follows:
Facility: Warehouse
Locations: Aisle 1, Aisle 2, Shelf 1, etc.
For reference, the date and time should be checked often on any mobile device. If these values are out of synchronization, the data will be written properly to the database, but the date and time will not be accurate.
However, in addition to setting the correct date and time, formatting the date/time is also important. The date/time format and separators must match for both the handheld terminal and the PC application database. Review the “Set Short Date Format” section of the handheld information pdf file that was provided in the documents folder of your downloaded application installation file for the correct format detail.
Question: Why does the storage location (facility) show up as unassigned/unassigned when we sync the tools we’ve added with the TTS “Add Tools” function on the mobile handheld terminal to the server?
Answer: Depending upon the version of software you have, the handheld ‘Add Tool’ function doesn’t require you to enter a storage location. This was by design, to keep the function simple and require minimum input from the user. So, it automatically designates the storage facility and location as ‘unassigned/unassigned’
Once the transactions are uploaded, synched and ‘Committed’ to the database, the user can go to the “Find Tool” function. From there, search, under the Facility and Location dropdowns, for all ‘unassigned/unassigned’ items.
Then, from the same ‘Find Tool’ screen, Select the “Change Storage Location’ button.
The storage locations for tools can be changed as a group, or individually.
 Home for Client Center